This is an old revision of the document!
Shading / Textures
PBR (Physically Based Rendering) are best rendered with Cycles render engine. The material reacts to the environment and lighting in a physically realistic way.
HDRi textures can be used on the World shader to bring lighting to the scene.
To turn off its display : Render > Film and tick Transparent.
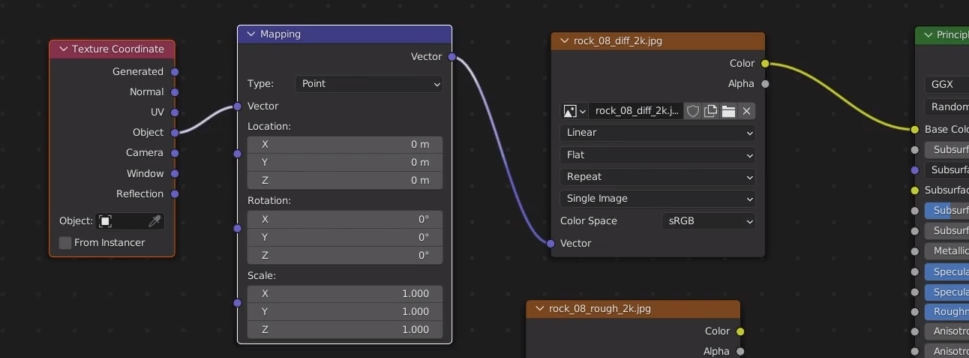
Texture Coordinates
For all the texture nodes use a Texture coordinate node (output Object) connected to a Mapping node (input Vector) in turn connected to the texture images (in/out Vectors) as illustrated below.
If you have Node Wrangler add-on activated, the keyboard shortcut CTRL + T will automatically generate these nodes.
Incidently, using Node Wrangler add-on you can select the Principled BSDF and use CTRL + SHIFT + T to open a bundle of maps and have them set-up as a Principled Texture.
Base Color
Keep the diffuse image in sRGB colorspace but if your mapping on an object use a Box projection instead of Flat.
Roughness
For roughness use Non-Color colorspace and Box projection as well.
Normal
For the normals use Non-Color colorspace and Box projection. Use a Normal map node to convert the output Color to the input Normal of the Principled BSDF
Displacement
The displacement avoids the Principled BSDF and goes directly into the Displacement input of the Material Output. This is because the displacement actually affects the geometry of the object whereas the Principled BSDF affects the way it looks.
Displacement must be activated in the Options under the Surface tab (choose : Displacement and Bump instead of Bump Only)
Displacement works best when there are many polygons on the object (use of a Subdivision Surface modifier is advised) and adds a good bit of detail. The drawback is it takes a lot more processing power and it's use is not advised for games.
Box Projection Method
Box projection has the advatage of being quick to setup, works with modifiers (e.g. bevel) and automatically updates if you modify the shape (e.g. extrude).
However, it does not work with a game engine, which require a proper UV Map (hence, we cannot choose the Object output of the Texture Coordinate Node).
UV Map Method
UV Map on the other hand requires to properly unwrap your object but once textured it can be exported easily to a game engine. The downside is you will see the seams, and there is no way to blend it so you should think carefully about where you place them, and keep your objects at a safe viewing distance. Another inconvenience is that you have to apply the modifiers for the seams to be set properly so it is slightly destructive.
Both these methods however keep the advantage of being able to easily change the PBR texture.
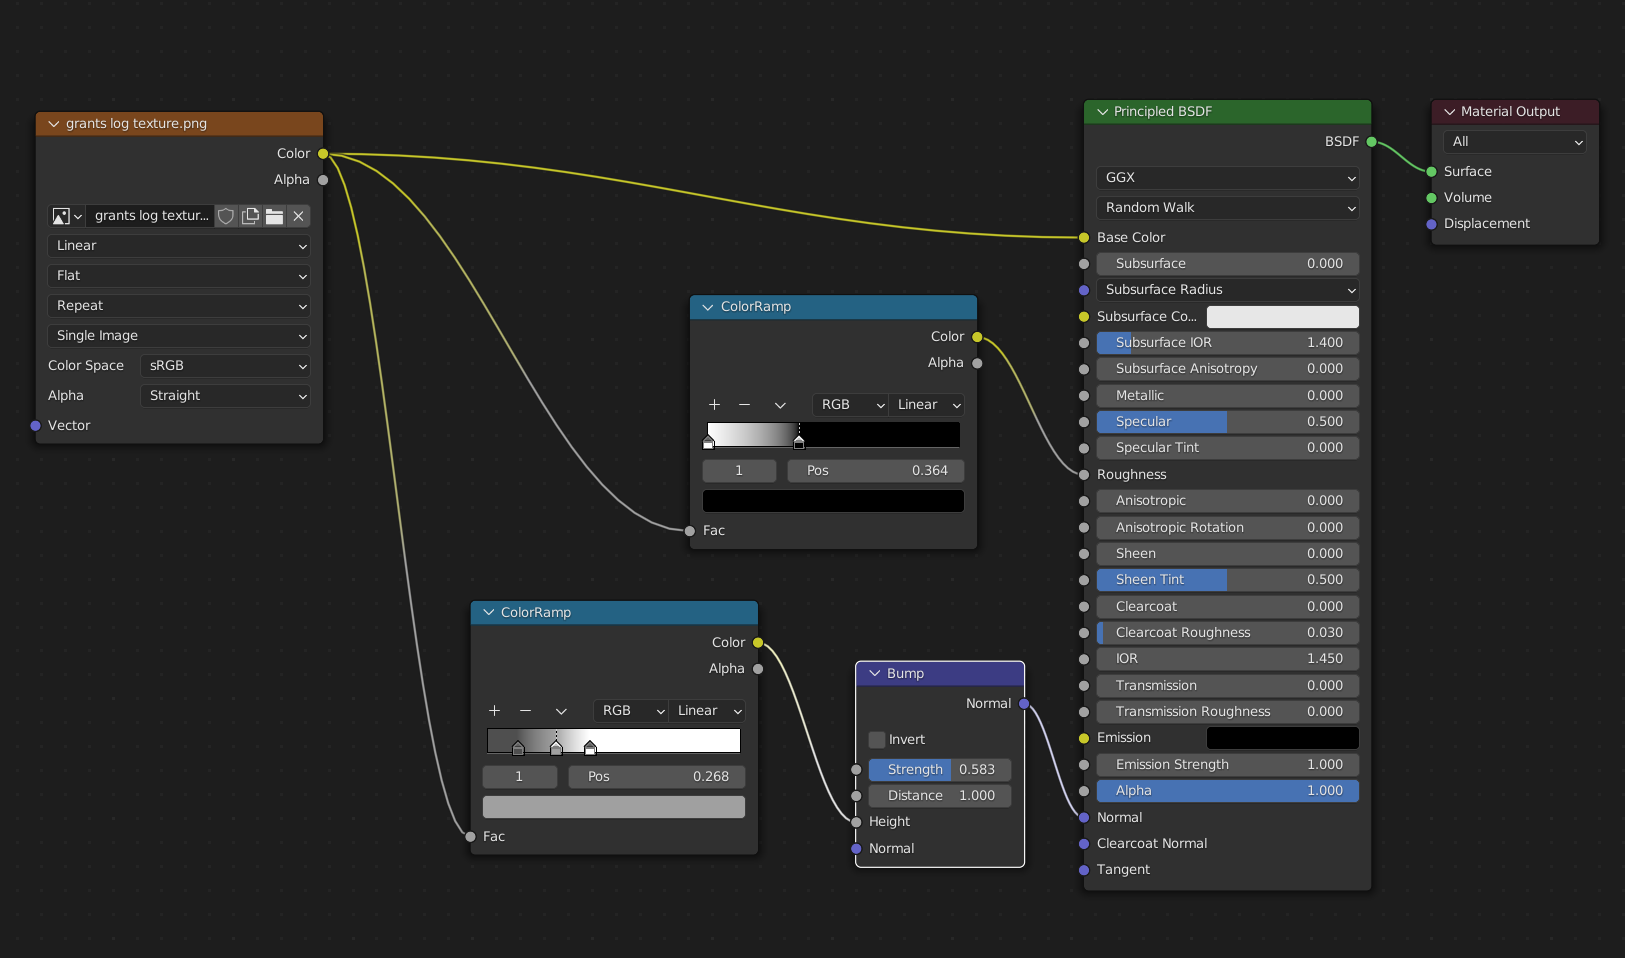
Texture painting
You can also load an image into a texture brush and paint directly on the object. In which case, choosing a random tiling and a large brush along with isolated-click painting instead of strokes can result in a good looking object. One drawback is the object has no roughness and the texture looks a bit flat.
In the case of texture painting, there is a way to add a bit of normals and bumpiness using the data from the image texture and a few color ramps as so :
Texture Atlas
A texture atlas is a custom image combining many different textures all in one image. It has the huge advantage of asking the CPU/GPU to load only one image and pick all the textures for different objects from parts of that image. The inconvenience is that each texture will have a lower pixel resolution (being part of a greater image)
Seamless textures
Using seamless textures is useful as the texture will repeat itself when scaled without it being too noticeable at a glance. However, if you scale too much, a pattern will become visible as the texture repeats itself.
There are two ways to scale :
In the node editor, on the mapping node :

In the UV editor, by scaling the unwrap. This second option is preferable if you are going to export your scene to a game engine as the UV unwrap (and it's scale) will be exported with it.

A handy feature of seamless textures is that they will continue applying if you modify your geometry. One good way to do this is with an edge slide (Shortcut : G + G). If you want to edge slide beyond the existing geometry you need to remove clamping (Shortcut : C while edge-sliding).

Procedural textures
Procedural textures are created by using nodes instead of images or photographs to create a material. Basic texture nodes are mixed together (often with a MixRGB node) and the Color output is then used to give both roughness and normals to the material.

When creating textures with this method it's important to think macro-details and micro-details and mix them together. The Scale value of the basic texture nodes can be used to this effect.
A rapid shortcut to create a mix node is to CTRL + SHIFT + RIGHT-CLICK & DRAG from one node to the other one that you want to mix.
The procedural textures can be very easily tweaked and modified. They do not require much artistic skills as opposed to the creation of textures based on images and photographs (although those are often available for free or a small fee on many platforms online). One downside however is that these textures need to be baked to be exported to a game engine, although that is a minor downside as baking is often required when exporting to game engines anyways.
Sample Low Poly Shaders
Stone with noise

Wood with noise

Texture Painting
Texture painting can be done in the Texture Painting workspace.
To texture paint on an object, it needs to be UV unwrapped. (The default cube is already unwrapped).
You also need a texture image to paint on. To easily create one, in Texture Paint mode select the Texture slots drop down menu and click + to add a texture.
It will be automatically added to the material in the Shader editor.
Color picker & Color Palette
In the Tool tab, the Color Picker contains the color wheel to select different colors.
Hovering over a color in the 3D Viewport and pressing SHIFT + X will update the color picker to the color hovered over.
With a palette created and open, maintaining SHIFT + X and LEFT CLICKING will add the color to the palette.
Masks
Masks can be added with the Mask brush but need a Stencil Mask to work on.
These can be found with the drop down menu next to the Texture Slots.
Once a mask is created and selected, simply paint with the Mask brush to apply a mask preventing further painting on that area with another brush.
Remember to tick the Fake user icon to save the mask in the project file.
Texture images
Texture images can be added in the Texture menu of the Color Picker
You can duplicate a brush to create a texture image on the cloned brush.
Once a texture image is created in the Color Palette use the Texture tab to open an existing image.
Back in the Color Picker (Tool tab), under the Stroke property switch the Method to Anchored
